Generate alt text with AI and Sirv
Image alt tags are important for both accessibility and SEO. But writing alt tags and adding them to images can be quite a chore. What if there was a way to automate this process?
Luckily, image recognition services like BLIP and Azure's Computer Vision have come a long way. Let's leverage the power of AI and a little bit of coding magic to automatically add alt tags to your images...
Adding alt text with Sirv
All images hosted at Sirv have a special meta description field. It can be used as the alt text source in various Sirv components.
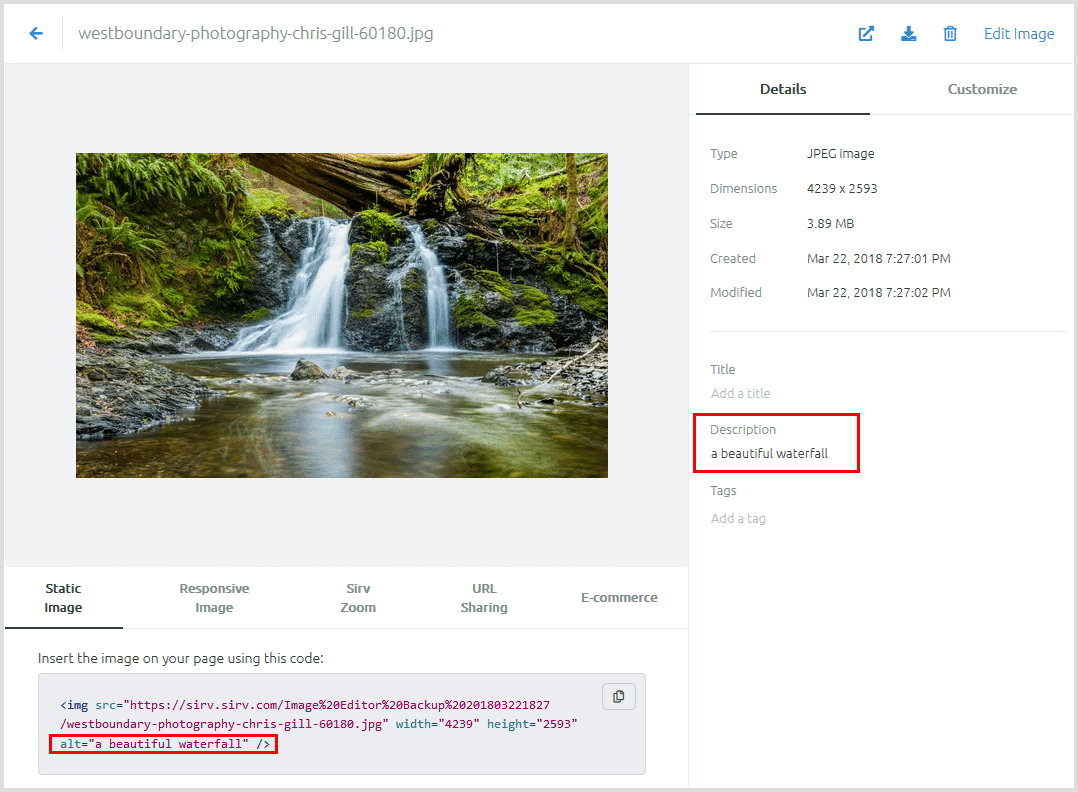
The description is used as the alt text in the Sirv web app.
That meta description will also be applied as an alt tag whenever you use Sirv Media Viewer for your images and galleries. More about that below.
To automatically add alt tags to images, we can use either Replicate with the BLIP2 model or Azure Computer Vision. Then, we'll populate Sirv image descriptions with data returned by Azure Computer Vision.
This comes with an added bonus of better search results in the Sirv app, because image descriptions are also searchable.
Here's how this can work with Sirv...
Auto alt text in Sirv responsive images
Sirv automatically adds alt tags (if their value is empty) to responsive images. To maximize SEO benefits, Sirv responsive images are delivered in the most optimal file format and dimensions, which makes them load incredibly fast.
Sirv Media Viewer
Image alt tags are also automatically populated in gallery images in Sirv Media Viewer. This makes managing alt tags for e-commerce sites a breeze. This works great with our plugins for WordPress, WooCommerce, Adobe Commerce (formerly Magento) and PrestaShop.
Automatic alt tags with BLIP2 and Replicate (Recommended option)
BLIP2 is the newest image recognition model by Salesforce, in our testing it's proven itself to be far more accurate compared to Azure Computer Vision (it's not even close).
To automatically tag your images with BLIP or BLIP2 on Replicate's infrastructure follow the instructions here.
If you don't have a huge library of images, and don't want the cutting edge BLIP2 model goodness, you can use the original BLIP version on Google Colab.
Automatic alt tags with Azure Computer Vision (not recommended)
To get started, we'll need API keys from Azure and Sirv.
Prerequisites
- A Sirv account - sign up here if you're new to Sirv
- Microsoft Azure account - see below
- Azure Computer Vision SDK
Sign up for Azure Computer Vision
- Sign up for a free Azure account.
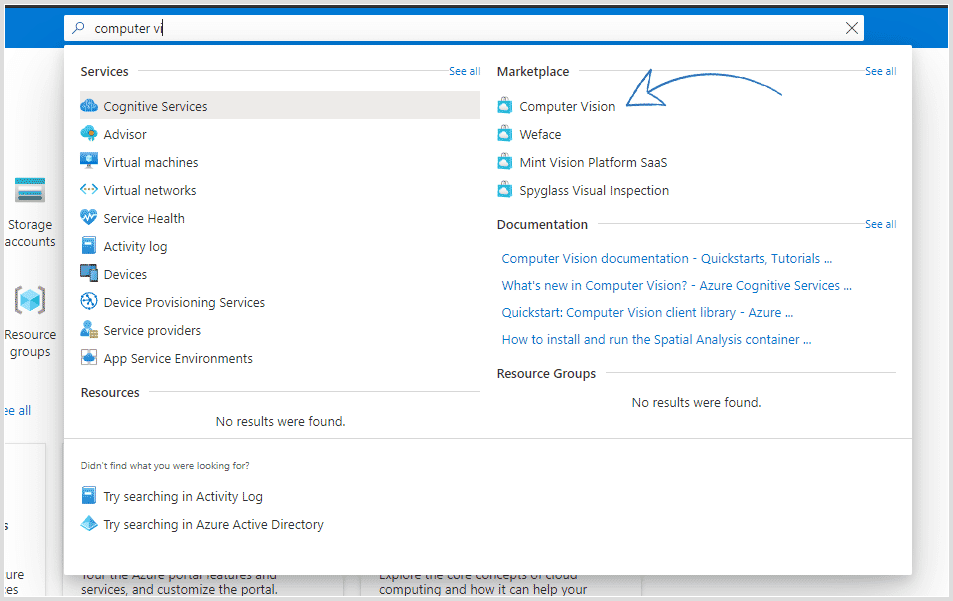
- Add Computer Vision:
![How to find computer vision]()
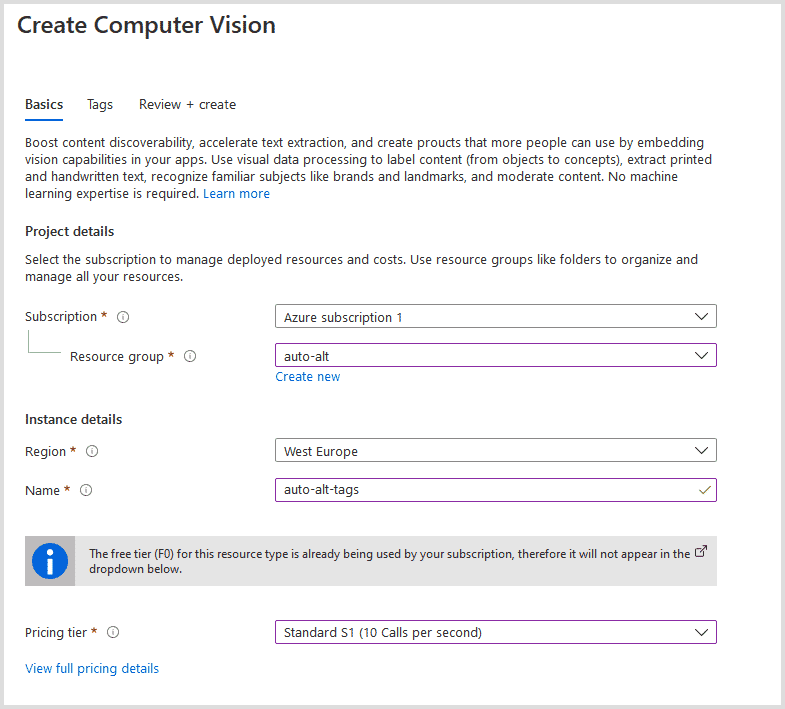
- Create a Computer Vision instance:
![Computer Vision instance]()
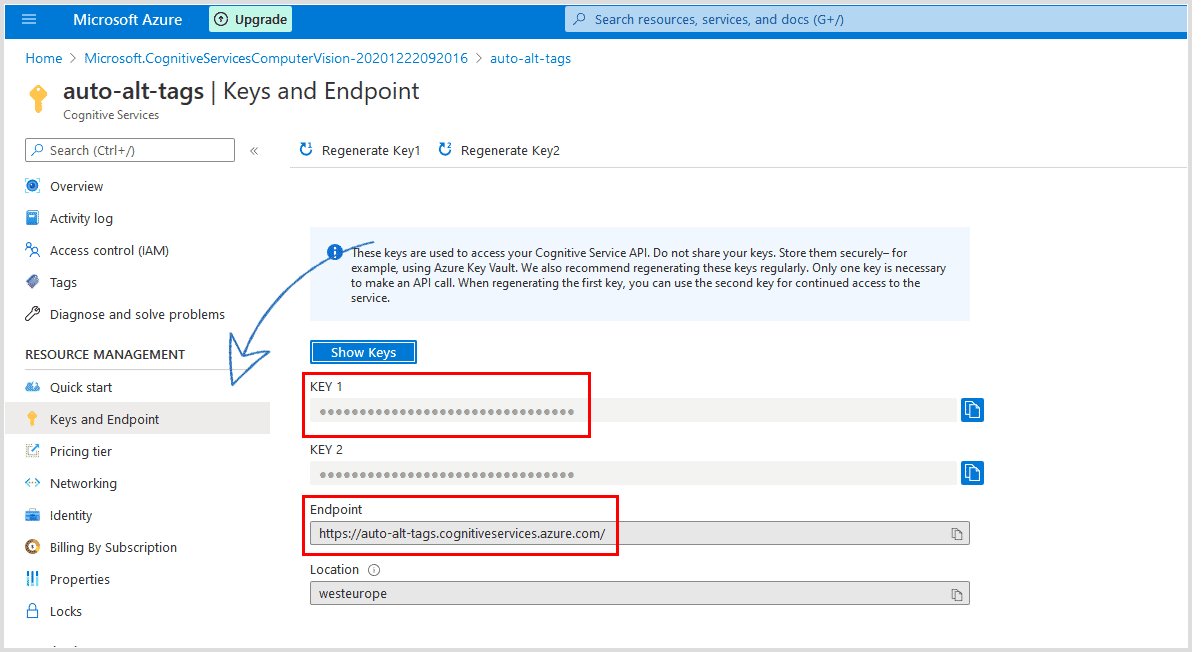
- After your deployment is complete, save your API key and the endpoint address:
![Azure computer vision API keys]()
- Set up Azure's Computer Vision SDK for the language of your choice. We'll be using Python in this example.
Get Sirv REST API keys
- Sign up for Sirv if you haven't already.
- Create a new REST API client in your account settings.
- Save your clientId and client secret keys.
- Sirv REST API Postman collection - for easier debugging.
- Sirv REST API reference - full list of API methods.
Add an alt tag to an image automatically
Once you have the Azure Computer Vision SDK installed and all credentials saved, it's time for the good stuff. We'll use Python for this example.
1. Add required libraries
Create a new Python file, autoalt.py for example. Then open it in your favorite editor and add the required libraries:
from azure.cognitiveservices.vision.computervision import ComputerVisionClient
from azure.cognitiveservices.vision.computervision.models import OperationStatusCodes
from azure.cognitiveservices.vision.computervision.models import VisualFeatureTypes
from msrest.authentication import CognitiveServicesCredentials
from array import array
import os
import json
import requests
from PIL import Image
import sys
import time
from urllib.parse import urlparse
2. Set up variables
Add Computer Vision and Sirv API keys as variables:
# Your subscription key and endpoint
subscription_key = "YOUR AZURE SUBSCRIPTION KEY"
endpoint = "YOUR AZURE ENDPOINT URL, example - https://we.cognitiveservices.azure.com/"

#Sirv credentials
sirv_id = "YOUR SIRV CLIENT ID HERE"
sirv_secret = "YOUR SIRV CLIENT SECRET HERE"

#The image we're going to get a description for
remote_image_url = "https://demo.sirv.com/leopard.jpg"
We've also included an image URL in the remote_image_url variable.
3. Authenticate
Create a Computer Vision client and get Sirv's authentication token:
#Create Azure client
computervision_client = ComputerVisionClient(endpoint, CognitiveServicesCredentials(subscription_key))

# Get Sirv auth token. API reference - https://apidocs.sirv.com/#connect-to-sirv-api
payload = {
  'clientId': sirv_id,
  'clientSecret': sirv_secret
}

headers = {'content-type': 'application/json'}
response = requests.request('POST', 'https://api.sirv.com/v2/token', data=json.dumps(payload), headers=headers)
token = response.json()['token']
Great, now we can finally interact with both APIs.
4. Get the image description and update it in Sirv
Here's how we can generate an image description:
# Create a Computer Vision client
description_results = computervision_client.describe_image(remote_image_url )

# Get the captions (descriptions) from the response, with confidence level
print("Description of remote image: ")
if (len(description_results.captions) == 0):
  print("No description detected.")
else:
  for caption in description_results.captions:
    print("'{}' with confidence {:.2f}%".format(caption.text, caption.confidence * 100))
    description = '{"description": "'+ caption.text + '"}'
    '''
    Update the image description in Sirv.
    API reference - https://apidocs.sirv.com/#set-meta-description
    '''
    # Grabbing the image path as the filename.
    params = {"filename": urlparse(remote_image_url).path}
    headers = {
      'content-type': "application/json",
      'authorization': 'Bearer %s' % token
    }
    response = requests.request('POST', 'https://api.sirv.com/v2/files/meta/description', data=description.encode('utf-8'), headers=headers, params=params)
    print(response)
Optionally, you can add a confidence check, to only update image description if the confidence level is high enough.
It'll look like this:
# Create a Computer Vision client
description_results = computervision_client.describe_image(remote_image_url )

# Get the captions (descriptions) from the response, with confidence level
print("Description of remote image: ")
if (len(description_results.captions) == 0):
  print("No description detected.")
else:
  for caption in description_results.captions:
    print("'{}' with confidence {:.2f}%".format(caption.text, caption.confidence * 100))
    description = '{"description": "'+ caption.text + '"}'

    # Change the number 60 here to a desired confidence percentage level.
    if (caption.confidence * 100 > 60):
      '''
      Update the image description in Sirv.
      API reference - https://apidocs.sirv.com/#set-meta-description
      '''
      # Grabbing the image path as the filename.
      params = {"filename": urlparse(remote_image_url).path}
      headers = {
        'content-type': "application/json",
        'authorization': 'Bearer %s' % token
      }
      response = requests.request('POST', 'https://api.sirv.com/v2/files/meta/description', data=description.encode('utf-8'), headers=headers, params=params)
      print(response)
    else:
      print("no captions with high enough confidence level detected")
Now embed the image with the simple HTML below:
<img class="Sirv" data-src="https://demo.sirv.com/leopard.jpg">
Note how we don't need to specify an alt in the HTML - it will be added automatically by sirv.js during page load.
Here's the result:

The HTML triggered Sirv responsive imaging, to automatically resize the image, add an alt from the description and deliver it in WebP format (to supporting browsers). Here's the image info from the browser:
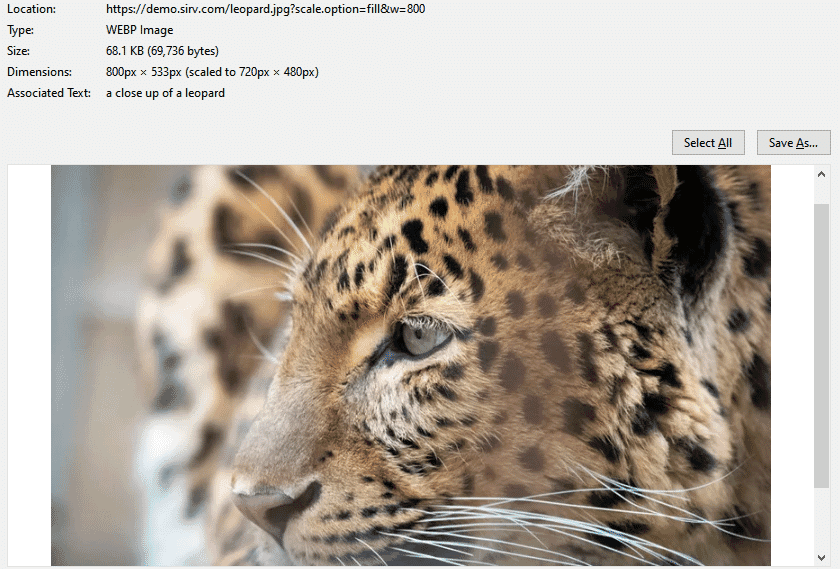
You can also see and use the image meta in JSON, simply by adding ?info to the URL, like this:
https://demo.sirv.com/leopard.jpg?info
5. Putting it all together
The full code looks like this:
  from azure.cognitiveservices.vision.computervision import ComputerVisionClient
  from azure.cognitiveservices.vision.computervision.models import OperationStatusCodes
  from azure.cognitiveservices.vision.computervision.models import VisualFeatureTypes
  from msrest.authentication import CognitiveServicesCredentials
  from array import array
  import os
  import json
  import requests
  from PIL import Image
  import sys
  import time
  from urllib.parse import urlparse

  # Your subscription key and endpoint
  subscription_key = "YOUR AZURE KEY"
  endpoint = "https://we.cognitiveservices.azure.com/"

  #Sirv credentials
  sirv_id = "Your CLIENT ID"
  sirv_secret = "YOUR CLIENT SECRET"


  #The image we're going to get a description for
  remote_image_url = "https://demo.sirv.com/leopard.jpg"

  #Create Azure client
  computervision_client = ComputerVisionClient(endpoint, CognitiveServicesCredentials(subscription_key))

  # Get Sirv auth token. API reference - https://apidocs.sirv.com/#connect-to-sirv-api
  payload = {
    'clientId': sirv_id,
    'clientSecret': sirv_secret
  }

  headers = {'content-type': 'application/json'}
  response = requests.request('POST', 'https://api.sirv.com/v2/token', data=json.dumps(payload), headers=headers)
  token = response.json()['token']

  # Create a Computer Vision client
  description_results = computervision_client.describe_image(remote_image_url )

  # Get the captions (descriptions) from the response, with confidence level
  print("Description of remote image: ")
  if (len(description_results.captions) == 0):
    print("No description detected.")
  else:
    for caption in description_results.captions:
      print("'{}' with confidence {:.2f}%".format(caption.text, caption.confidence * 100))
      description = '{"description": "'+ caption.text + '"}'
      '''
      Update the image description in Sirv.
      API reference - https://apidocs.sirv.com/#set-meta-description
      '''
      params = {"filename": urlparse(remote_image_url).path}
      headers = {
        'content-type': "application/json",
        'authorization': 'Bearer %s' % token
      }

      response = requests.request('POST', 'https://api.sirv.com/v2/files/meta/description', data=description.encode('utf-8'), headers=headers, params=params)
      print(response)
Adding image alt tags in bulk
Realistically, you'd want to add alt tags to images automatically in bulk. To pull this off, you should get image URLs from your Sirv account. There are several ways to do this.
Export images as a CSV file
For the sake of simplicity, let's export your Sirv images using the web app.
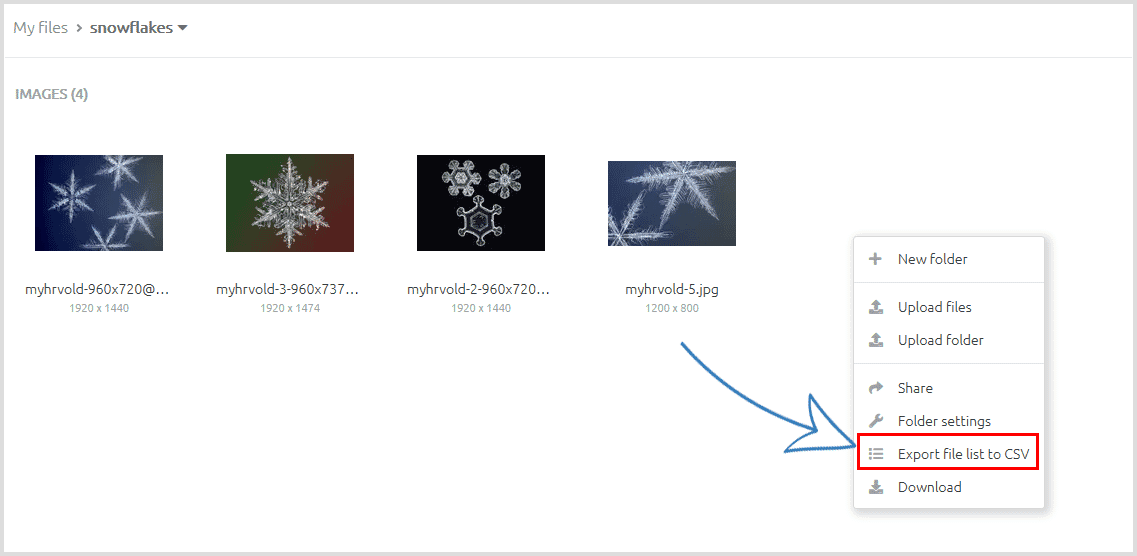
Save the image URLs as a separate text file (we'll name it images.txt) and drop it in the same folder where the script is located.
Then we can loop through each image to describe it and populate the Sirv description field.
Here's the full code:
![]()
from azure.cognitiveservices.vision.computervision import ComputerVisionClient
from azure.cognitiveservices.vision.computervision.models import OperationStatusCodes
from azure.cognitiveservices.vision.computervision.models import VisualFeatureTypes
from msrest.authentication import CognitiveServicesCredentials
from array import array
import os
import json
import requests
from PIL import Image
import sys
import time
from urllib.parse import urlparse

# Your subscription key and endpoint
subscription_key = "COMPUTER VISION KEY"
endpoint = "https://we.cognitiveservices.azure.com/"
#Sirv credentials
sirv_id = "YOUR SIRV CLIENT ID"
sirv_secret = "YOUR SIRV CLIENT SECRET"

#Create Azure client
computervision_client = ComputerVisionClient(endpoint, CognitiveServicesCredentials(subscription_key))

# Get Sirv auth token. API reference - https://apidocs.sirv.com/#connect-to-sirv-api
payload = {
  'clientId': sirv_id,
  'clientSecret': sirv_secret
}

#We're opening the csv file and looping through each image in the file
with open('images.txt') as f:
  for image in f:
    headers = {'content-type': 'application/json'}
    response = requests.request('POST', 'https://api.sirv.com/v2/token', data=json.dumps(payload), headers=headers)
    token = response.json()['token']

    # Create a Computer Vision client
    description_results = computervision_client.describe_image(image)

    # Get the captions (descriptions) from the response, with confidence level
    print("Description of remote image: ")
    if (len(description_results.captions) == 0):
      print("No description detected.")
    else:
      for caption in description_results.captions:
        print("'{}' with confidence {:.2f}%".format(caption.text, caption.confidence * 100))
        description = '{"description": "'+ caption.text + '"}'
        '''
        Update the image description in Sirv.
        API reference - https://apidocs.sirv.com/#set-meta-description
        '''
        params = {"filename": urlparse(image).path.replace('n', '')}
        headers = {
          'content-type': "application/json",
          'authorization': 'Bearer %s' % token
        }

        response = requests.request('POST', 'https://api.sirv.com/v2/files/meta/description', data=description.encode('utf-8'), headers=headers, params=params)
        print(response)
        print('4 second pause')
        time.sleep(4)
Get list of files with Sirv API
You can get a full list of files within a specific folder (and subfolders) with the folder contents API method.
For more advanced control, you can use Sirv's search API method to perform sophisticated file searches, such as a list of all .jpg images added in the last 30 days to a particular folder.
Got any questions?
As you can see, it's surprisingly easy to enrich your images with the help of AI.
If you have any questions about using AI with your images, please contact the Sirv team.